IP Warm-up schedule: Why is it important?
Every time you add a new IP address to your account, it starts off without a reputation with the Internet Service Providers and is known as a cold IP. To build your reputation, you need to warm up your IP through the practice of increasing your email sending volume and following a pre-planned schedule.
Your IP may also be considered cold if you have not sent from it for more than 30 days, so you will need to go through the warm-up schedule process again, even if you have done it before.
How do you get from cold to warm?
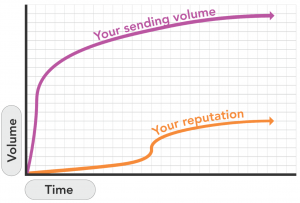
Warming up your IP is vital if you want to build and maintain your influence independent of other senders. As you can expect, when evaluating the sending behavior of IP addresses, most ISPs are reasonably cautious when it comes to dealing with cold IPs.
Starting an email campaign with all guns blazing is not going to do you any favors. Slowly warming up your IP by gradually increasing your sending volume, along with following other best practices, will help you to achieve a positive sending reputation.
1. Content
Sending good content from the beginning is extremely beneficial when you are trying to build a stable reputation and gain problem-free inbox placement. Because damage to your reputation can be near irreversible, you should always avoid sending any potentially suspicious content.
2. List quality
Since user engagement builds ISP trust and brings the best results for your email deliverability, avoid buying email lists as they lead to being flagged by ISPs and your IP being blocked. Only send emails to subscribers who have signed up through your single or double (recommended) opt-in process.
3. Steady volume
Large surges of emails can often be seen as spam by ISPs, so it’s important to keep a steady volume of emails to build your reputation. The way to do this is by following our schedule below, rather than sending out 35,000 emails at once.
This habit needs to be consistent as email monitoring systems usually only analyze the previous one to two weeks. Breaking your sending pattern will mean that you are back to square one and will need to start again.
4. First email campaign
When you send your first email campaign, Internet Service Providers will begin gathering and assembling your reputation data. They will take into account bounces, complaints, opens, and clicks. As we mentioned before, starting off your first emails with your best campaign content is crucial as this is the time that will have a positive influence on the sending domain as well as the IP address. This also means that it is important to send to the most engaged users first. These are the subscribers that have recently showed opened or clicked activity, or have just signed up to your newsletter via the double opt-in process.
5. Feedback
Acting on the feedback that ISPs provide is a great way to build up your reputation, and following their instructions shows your willingness to cooperate. For example, getting a block means that you need to scale down your campaign, so you should act accordingly in order to improve your reputation.
Following these email delivery practices will mean the difference between a successfully delivered email for the user, and your mail winding up in the spam folder.
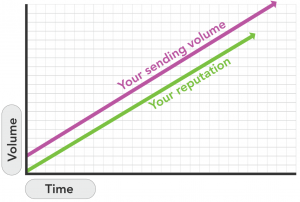
Responsible ramping up of your volume
Since a fast-paced and unplanned big volume approach leads to blocks and rate limitations, your approach to the warm-up schedule process plays a crucial role in how ISP monitoring systems label your IP address. Opting for a conservative approach, with gradual builds in volume, will mean that rate limitations and blocks will only occur if the engagement is poor, the complaint rate is too high, there is bad content or a bad quality email list is used.
Inboxroad effective warm-up plan
Below you will find our basic IP warm-up plan. Some important points to note are:
When selecting the volume, make sure that it is divided over multiple Internet Service Providers. Start with your most engaged subscribers, preferably openers or clickers from the last 30 days. The volumes presented in this table are the maximum hourly limits during the warm-up plan period based on 2 IP’s.
| Day | Hourly limit | Total per day | Cumulative |
|---|---|---|---|
| 1 | 20 | 480 | 480 |
| 2 | 28 | 672 | 1,152 |
| 3 | 39 | 936 | 2,088 |
| 4 | 56 | 1,344 | 3,432 |
| 5 | 82 | 1,968 | 5,400 |
| 6 | 120 | 2,880 | 8,280 |
| 7 | 158 | 3,792 | 12,072 |
| 8 | 208 | 4,992 | 17,064 |
| 9 | 258 | 6,192 | 23,256 |
| 10 | 382 | 9,168 | 32,424 |
| 11 | 456 | 10,744 | 43,368 |
| 12 | 530 | 12,720 | 56,088 |
| 13 | 628 | 15,072 | 71,160 |
| 14 | 726 | 17,424 | 88,584 |
| 15 | 846 | 20,352 | 108,936 |
| 16 | 970 | 23,280 | 132,216 |
| 17 | 1,116 | 26,784 | 159,000 |
| 18 | 1,262 | 30,288 | 189,288 |
| 19 | 1,432 | 34,368 | 223,656 |
| 20 | 1,602 | 38,368 | 262,024 |
| 21 | 1,802 | 43,488 | 305,704 |
| 22 | 2,038 | 48,680 | 354,384 |
| 23 | 2,304 | 55,296 | 409,680 |
| 24 | 2,570 | 61,280 | 471,972 |
| 25 | 2,884 | 69,216 | 540,888 |
| 26 | 3,198 | 76,752 | 617,640 |
| 27 | 3,560 | 85,440 | 703,080 |
| 28 | 3,922 | 94,128 | 797,208 |
| 29 | 4,332 | 103,968 | 901,176 |
| 30 | 4,694 | 112,656 | 1,013,832 |
What can you expect of the warm-up schedule?
Your initial campaign might have some trouble reaching customers, due to the first few weeks often being marked by throttling and blocking by larger ISPs.
Sticking to your plan and following the feedback from the ISPs is key to reaching your customers’ inboxes.
After the initial few weeks, most of the blocks will clear up if you are sticking to your plan, resulting in a good and steady reputation.
Best practices for your IP warm-up plan checklist
Take a look at our list of best practices so you can get started on your IP warm-up today.
Do’s for a warm-up schedule:
- Proper authentication like DMARC, MX, DKIM, SPF, Sender ID
- Create a public Whois
- Have a single or double (recommended) opt-in process
- Analyse feedback provided by ISPs
- Route volume for each ISP
- Ensure your domain name is linked to an existing website
- Configure your email addresses for abuse and postmaster
- Ensure that you use separate (sub)domains for transactions and marketing
- Use a clear and instant link for unsubscribing
- Monitor blacklists
- Use feedback loops and monitor spam complaints
- Keep your sending volume steady
- Use your most engaging data first
- Optimise the text to image ratio
- Have an identifiable sending domain and use a reply address
- Optimise email campaigns for all email clients
Dont’s for a warm-up schedule:
- Buying email lists
- Hitting spam traps and honey pots
- Using spam trigger words and link shorteners
- Sending to inactive email addresses
- Shared reputations – use dedicated IP addresses exclusively
- Starting off with high volume
- IP rotation – this will not help you build a reputation
Targeting Gmail
In case of targeting Gmail subscribers, please apply the following practices:
- Add the sending domains to Google Postmaster Tools where really important information is provided to build a good reputation on Gmail – https://inboxroad.com/documentation/google-postmaster-tools/
- Limit your volume and build up slowly. Example of volume that should be sent to Google during a warm-up schedule:
Day 1: 100 emails
Day 2: 150 emails
Day 3: 200 emails
Day 4: 250 emails
Day 5: 300 emails
Day 6: 350 emails
Day 7: 400 emails
Day 8: 450 emails
Day 9: 500 emails
Day 10: 600 emails
Day 11: 700 emails
Day 12: 800 emails
Day 13: 900 emails
Day 14: 1000 emails
Day 14-15: It’s time to have a call with us, where we will review your sendings together and plan the best strategy to continue scaling up and building a good reputation on Gmail.
Don’t forget to check also Gmail sender guidelines to successfully send and deliver emails to Gmail email accounts.


